Orton Technique Applied to Christmas Lights
The Orton Technique consists of combining two photos of the same subject, one in focus and the other out of focus. The purpose is to add a glowing halo effect to the subject. This article describes an example of applying the Orton Technique to digital photos of Christmas lights, using Adobe Photoshop Elements to combine the two photos. You'll need a camera that's capable of manual focus, as well as a tripod to hold the camera in the same position for both shots.
-
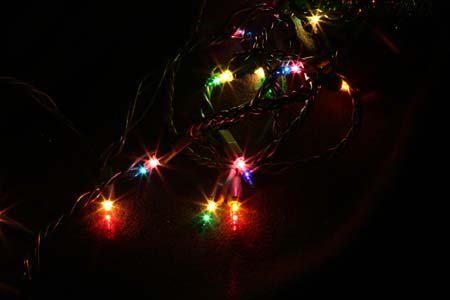
Take a picture of the Christmas lights with the camera in sharp focus.In the following example, I used my smallest available F-stop, F/22, in order to get a nice twinkling effect.
-
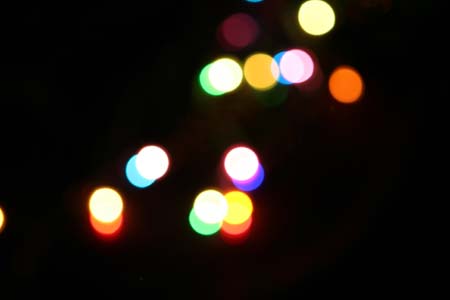
Take the same picture again, this time with the camera somewhat out of focus so that the Christmas lights appear as round blurs.The more out-of-focus you go, the larger the blurs.You might want to try taking several pictures at different focus settings, so that you'll have a range of blur sizes to choose from. In the following example, I set the camera just slightly out of focus, and I used my largest available F-stop, F/2.8, in order to get as much blur as possible. (You won't get much blur at F/22 because there's too much depth-of-field.)
-
Download both photos to your computer, then open both photos in Adobe Photoshop Elements. Do your normal photo editing as needed (e.g. adjust levels,
hue/saturation, etc.).You may want to turn up the levels higher than normal on the blurred picture, in order to get a better halo effect.
-
Go to the blurred photo. Select the entire blurred photo, by clicking on Select -> All in the menu.Then click on Edit -> Copy in the menu.
-
Go to the in-focus photo, and click on Edit -> Paste.This will paste the blurred photo as a new layer on top of the in-focus photo.
-
You'll need to look at the Layers window to do the next adjustment.If the Layers window isn't visible on your screen, click on Window -> Layers
in the menu.
-
In the Layers window, you'll see that the default opacity of the new layer is 100%.Using the slider bar, gradually reduce the opacity until you can
see enough of the in-focus picture.Use your own judgment to find the right balance between the blurred photo vs. the in-focus photo. The following example is a combination of the previous two photos, with the opacity of the blurred photo set to about 30%.

-
Click on File -> Save as, and save your combined photo under a different file name, so that you don't over-write your original photo.
Additional hint:If your blurred photo isn't blurry enough, try applying the Gaussian Blur filter to make it even more blurry. Warning: The above example was done with indoor lights. This technique might not work well for outdoor Christmas lights, if it's a windy night. Ideally, you'll want a calm night with no wind.
If you want to see an examples of the Orton Technique please visit Michael Orton's "Orton Effect" page on his website at
http://www.michaelortonphotography.com/ortoneffect.html
NOTE: The original http://www.tonydegroot.com/Tips02.htm page is no longer available. Instead visit https://en.wikipedia.org/wiki/Orton_(photography) for more information and links.